
Using a servo motor with a Pi Pico board in MicroPython
(Updated at 01/20/2023)
Servo motors, sometimes called “servo,” can be controlled and kept at a specific angular position. They’re great for projects due to their power-to-weight ratio. TowerPro’s SG90 servo is an example; it weighs only 9g yet has a 1.5 kg/cm torque. Plus, its low price and ease of use with a Pi Pico make it an ideal choice for makers!
Note
Servos are commonly used in RC models, mainly for wheel steering in remote-controlled cars and elevator and rudder control in airplanes. They also have applications in robotics and industry, such as regulating liquid flows in valves.
Take in hand the famous SG90 servo motor
A servo motor is distinct from a conventional engine because it is limited to 0 to 180 degrees rotation. It contains a DC motor, a gearing system for increased torque and reduced speed, and an integrated control system within a single housing. Remarkably, so many mechanisms can fit into such a small package.
Warning
Beginners should avoid manipulating the actuator shaft manually and stop before reaching the stop, as the shaft is quite fragile (made of plastic).
How works of a basic servo motor?
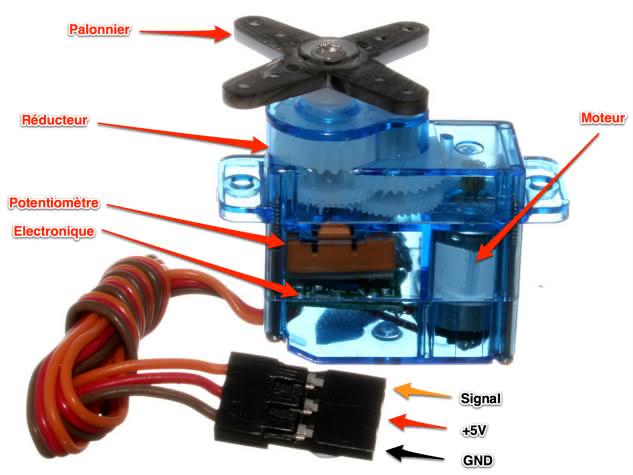
A DC motor is connected to a potentiometer and an electronic circuit. This connection allows the speed of the motor to be adjusted according to the position of the potentiometer. Gears are attached to the motor’s output shaft to increase torque and reduce speed. As the motor runs, the gears move the main shaft that holds the potentiometer. If the motor stops, the electronic circuitry will automatically adjust the speed so that the arm and potentiometer remain in the same place. This benefits robot arms that must be sustained in a particular position and not drop due to gravity when the movement stops.

An SG90 blue actuator is moved via Pulse Width Modulation (PWM) signals. These signals are sent to the actuator at 50Hz, meaning 50 signals per second. This rate corresponds to one pulse (signal) every 20 ms. The position of the actuator is determined by the length of each pulse, which is usually between 1 and 2 ms.
How to power the servo motor with a Raspberry Pi Pico?
As stated in the technical sheet , the power supply for this SG90 servo should be 5V, yet it is operational even when using 3.3V.
Note
The motor will operate more quickly and responsively with a voltage of 5V. The increased voltage will result in a faster rotation.
Servomotors usually require a large amount of current, mainly when producing substantial torque (or force) at the output. The Raspberry Pi Pico board contains a 5V USB port, usually limited to 500mA. Suppose you plan to use more than two servo motors. In that case, it is essential to use a separate power supply and to ensure that the negative terminal of the servomotor power supply is connected to the GND pin of the board.
SG90 servo connections to the Pi Pico
The SG90 servo motor has three wires - 2 for power and 1 for the control signal. You can tell them apart by the different colors.
Servomotor SG90 |
Wire Color |
RPi Pico |
|---|---|---|
|
Brown |
|
|
Red |
|
Signal |
Orange |
|
Note
Some models may have the signal wire in a different color, such as yellow or white, rather than orange.
The Pico can control a servo motor, as all its output pins can generate Pulse Width Modulation (PWM) output.
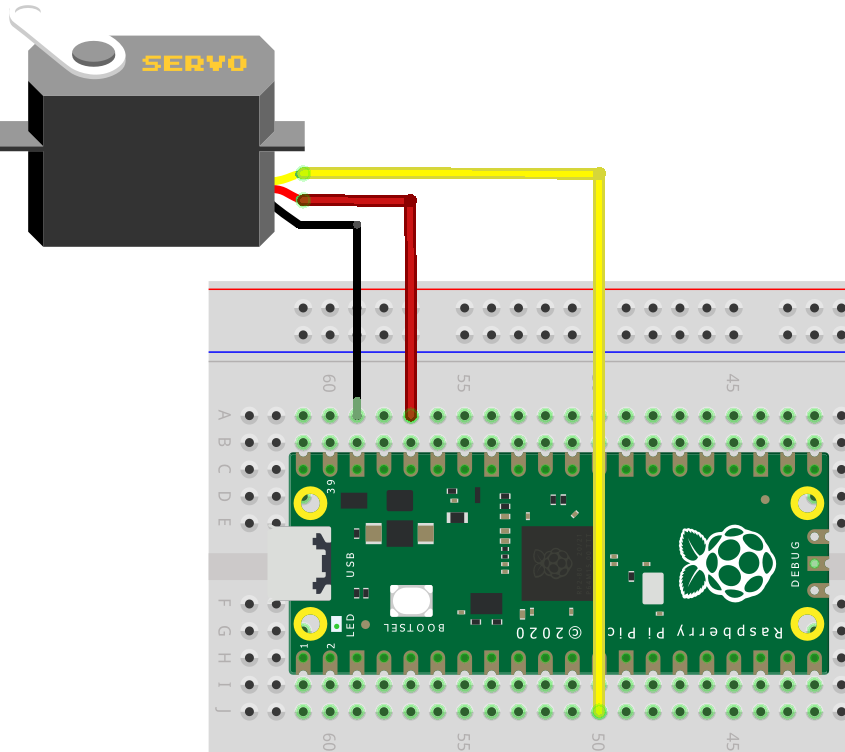
Circuit to drive a servo motor with a Raspberry Pi Pico
This circuit provides an easy way to use a servo motor. There are two versions of the circuit depending on the board used. The Pi Pico version is the most basic, and the uPesy RP2040 DevKit board version is an improved version of the Pi Pico.
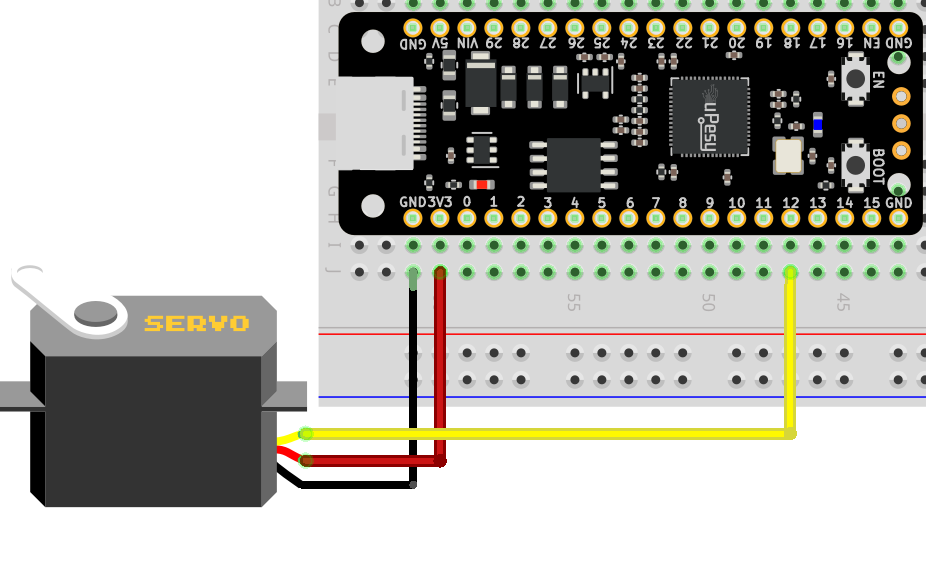
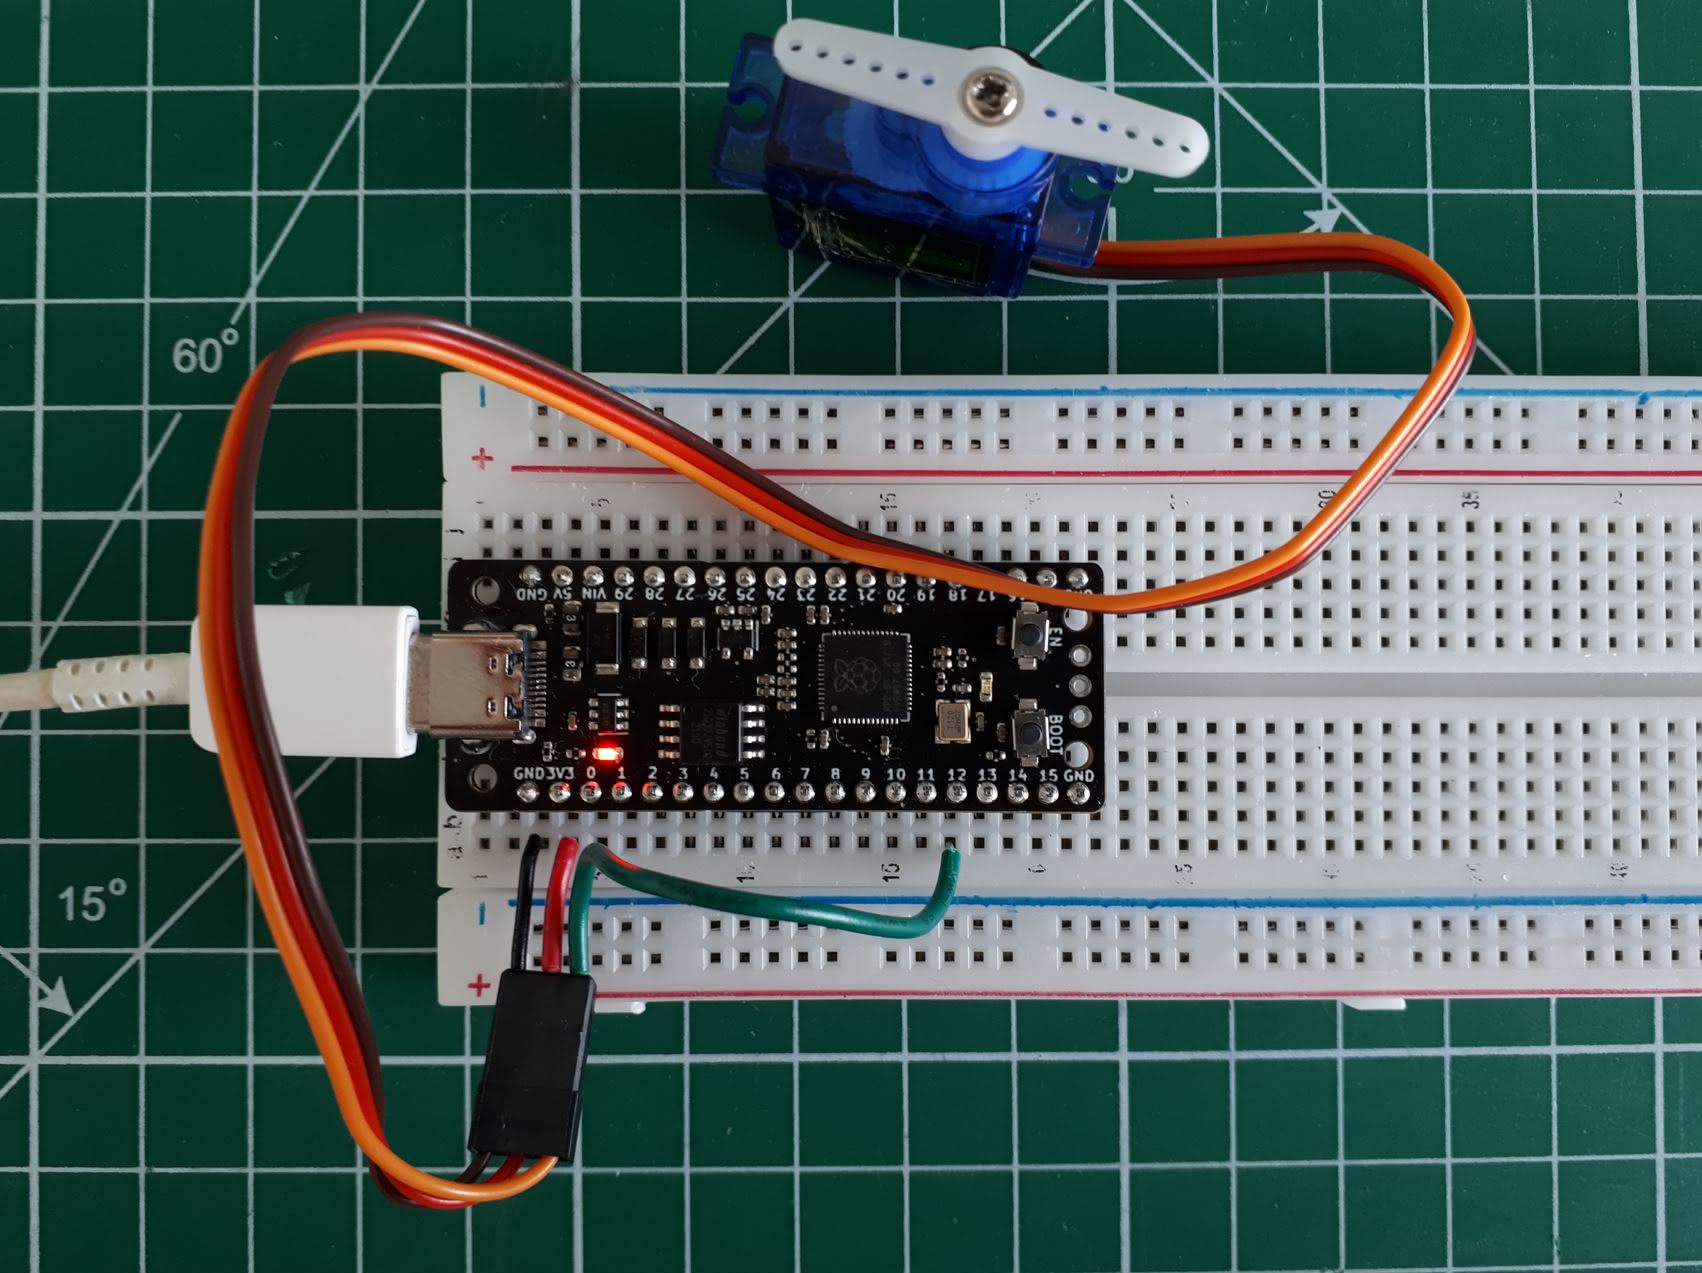
This is an example of hooking up a servo to the uPesy RP2040 DevKit board using a breadboard. The servo is here powered with a 3.3V supply.
Driving a servo motor from the Pico with a Python script
You can use an existing library if you want to spend less time and effort controlling servo motors. This will make it easier to calculate the correct values for each servo. Without a library, you only need to send a PWM signal to the servo motor to set its angular position. However, the calculations can be tedious if you manage multiple servo motors.
Manipulating servo motors can be tricky, as the PWM signal’s pulse width tells the motor the desired angular position. Calculating the correct values for multiple servos at once can be complex, so I suggest using a library to make your life easier for future tasks.
Basic Python script to drive the servo with its calculations
The TowerPro SG90 servo requires a pulse width modulation (PWM) signal. To determine the duty cycle and value in bits of the PWM, we must calculate the width of the signal in milliseconds (ms). The minimum position of the servo requires a 0.5ms PWM signal, and the maximum position requires a 2.4ms PWM signal.
Note
The challenge is to find the appropriate PWM pulse width to achieve the desired angular position.
Rather than going into all the math behind it, we’ll be taking advantage of a library to do the work for us. Here is a helpful script to get you started:
from machine import Pin,PWM
from time import sleep

sg90 = PWM(Pin(12, mode=Pin.OUT))
sg90.freq(50)

# 0.5ms/20ms = 0.025 = 2.5% duty cycle
# 2.4ms/20ms = 0.12 = 12% duty cycle

# 0.025*65535=1638
# 0.12*65535=7864

while True:
    sg90.duty_u16(1638)
    sleep(1)
    sg90.duty_u16(7864)
    sleep(1)
Control a servo via a Python script with the library servo.py
If you’re new to MicroPython, I recommend using this library to control servo motors. It can be installed in the same way as other MicroPython libraries.
Warning
In version 1.19 of MicroPython for the Raspberry Pi Pico, the servo library is not included in the default packages. However, the Pyboard does have the servo library as part of the default MicroPython package.
You can save the library on the Pi Pico directly from Thonny IDE
Here is the library to use
from machine import Pin, PWM

class Servo:
    __servo_pwm_freq = 50
    __min_u16_duty = 1640 - 2 # offset for correction
    __max_u16_duty = 7864 - 0  # offset for correction
    min_angle = 0
    max_angle = 180
    current_angle = 0.001


    def __init__(self, pin):
        self.__initialise(pin)


    def update_settings(self, servo_pwm_freq, min_u16_duty, max_u16_duty, min_angle, max_angle, pin):
        self.__servo_pwm_freq = servo_pwm_freq
        self.__min_u16_duty = min_u16_duty
        self.__max_u16_duty = max_u16_duty
        self.min_angle = min_angle
        self.max_angle = max_angle
        self.__initialise(pin)


    def move(self, angle):
        # round to 2 decimal places, so we have a chance of reducing unwanted servo adjustments
        angle = round(angle, 2)
        # do we need to move?
        if angle == self.current_angle:
            return
        self.current_angle = angle
        # calculate the new duty cycle and move the motor
        duty_u16 = self.__angle_to_u16_duty(angle)
        self.__motor.duty_u16(duty_u16)

    def __angle_to_u16_duty(self, angle):
        return int((angle - self.min_angle) * self.__angle_conversion_factor) + self.__min_u16_duty


    def __initialise(self, pin):
        self.current_angle = -0.001
        self.__angle_conversion_factor = (self.__max_u16_duty - self.__min_u16_duty) / (self.max_angle - self.min_angle)
        self.__motor = PWM(Pin(pin))
        self.__motor.freq(self.__servo_pwm_freq)
Using the library is extremely simple:
Import the class
Servo.Define an object
Servorepresenting your blue servo motor by specifying the pin used to drive it.Specify the desired angular position with the function
.move(angle)
from servo import Servo
import time

sg90_servo = Servo(pin=12)  #To be changed according to the pin used

while True:
    sg90_servo.move(0)  # turns the servo to 0°.
    time.sleep(1)
    sg90_servo.move(90)  # turns the servo to 90°.
    time.sleep(1)
Warning
You may need to change the offset values if you have a different type of actuator:
class Servo: __servo_pwm_freq = 50 __min_u16_duty = 1640 - 2 # offset for correction __max_u16_duty = 7864 - 0 # offset for correction
Here is a demonstration video with the above code:
Controlling the SG90 servo with the uPesy RP2040 DevKit board