
How to use interrupts in MicroPython on an ESP32 ?
(Updated at 01/23/2023)
In electronics, an interrupt is a signal sent to a processor to indicate that an important task must be executed immediately, thus interrupting the execution of the program in progress.
Interrupts can be generated in different ways, for example following an external event, a timer they allow certain tasks to be executed asynchronously, i.e. independently of the main program.
Interrupts in MicroPython
In practice, interruptions are generally used:
To execute portions of critical code when an external event occurs. For example, when a button is pressed, a Python function will automatically execute.
To perform functions periodically. For example, to flash an LED every 5 seconds.
You are going to tell me that we can already do this kind of script, without using interrupts. Yes, it’s true, but there are 2 major flaws without using them. Let’s take the example of a script that turns on a LED when the button is pressed:
from machine import Pin

pin_button = Pin(14, mode=Pin.IN, pull=Pin.PULL_UP)
pin_led    = Pin(2, mode=Pin.OUT)

while True:
    if not pin_button.value():
        pin_led.on()
    else:
        pin_led.off()
The first flaw is that the script spends its time scanning the value of the pin_button pin to know if the button has been pressed. The script can’t do other things in addition because otherwise the second flaw will occur: missing events. If the script performs other tasks in the loop, it may not be able to detect the temporary button press.
The advantage of using a hardware interrupt is that the detection is completely detached from the processor (and therefore from the Python script). With an interrupt the while loop of the script will be empty. The hardware block in charge of the detection is also much more reactive than the MicroPython script.
Note
With interrupts, there is no need to constantly scan the value of a pin: a function is executed automatically when a change is detected.
Whether with a timer or an external event, the interrupt is triggered following a signal change. Let’s discover the different possible variations 😊.
Triggering a hardware interrupt: detection modes
The detection of an event is based on the shape of the signal that arrives at the pin.
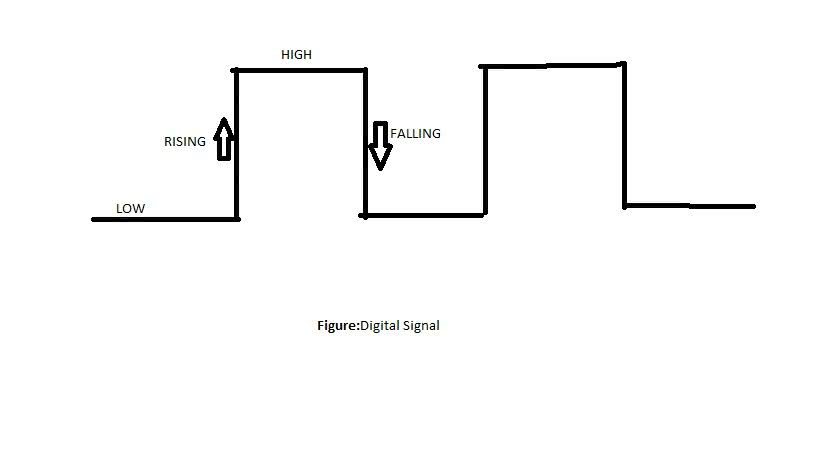
Here are the different types of possible detection of an interruption:
Pin.IRQ_LOW_LEVELtriggers the interrupt as soon as the signal is at 0VPin.IRQ_HIGH_LEVELtriggers the interrupt as soon as the signal is at 3.3VPin.IRQ_RISING: Triggers the interrupt as soon as the signal goes fromLOWàHIGH(From 0 to 3.3V)Pin.IRQ_FALLINGtriggers the interrupt as soon as the signal changes fromHIGHàLOW(From 3.3V to 0)
Note
The modes RISING and FALLING modes are the most used. Note that if you use the LOW and HIGH modes, the interrupt will be triggered in a loop as long as the signal does not change state.
Configuring and using interrupts in MicroPython on the ESP32
A basic skeleton script
Here is a skeleton code, to trigger an interrupt via an external signal on your ESP32 board with MicroPython :
from machine import Pin

pin_button = Pin(14, mode=Pin.IN, pull=Pin.PULL_UP)

def interruption_handler(pin):
    ...

pin_button.irq(trigger=Pin.IRQ_FALLING,handler=interruption_handler)

while True:
    ...
The script uses the function Pin.irq() function which allows to create an interrupt request on a falling edge of the signal present on the pin pin_button .
Note
irq stands for Interrupt Request to request an interrupt request.
When an interrupt is triggered the interruption_handler() function will be executed automatically. The interrupt routine will have as input argument the pin on which the event was detected.
It is a good practice to have an interrupt function (isr ) as fast as possible to avoid disturbing the main program which has been interrupted. For example, we will avoid sending data via I2C, SPI directly from an interrupt. We can use flags in the form of boolean to store the detection of an event and then process it in the main loop.
Note
Interrupt handling in microPython will always be much slower than in Arduino or pure C code! However, it is possible to minimize this latency by using advanced parameters .
Example: Turn on an LED when a push button is pressed
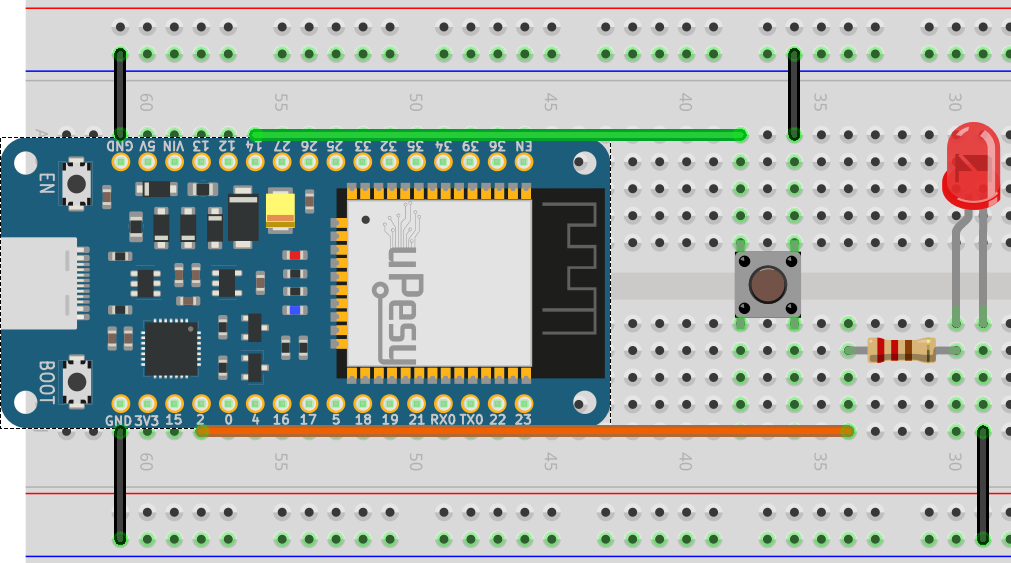
Here is the complete script that detects when a button is pressed with an interrupt and turns on the LED accordingly:
import time
from machine import Pin

pin_button = Pin(14, mode=Pin.IN, pull=Pin.PULL_UP)
pin_led    = Pin(2, mode=Pin.OUT)


def button_isr(pin):
  pin_led.value(not pin_led.value())

pin_button.irq(trigger=Pin.IRQ_FALLING,handler=button_isr)

while True:
  ...
Note
In this example, the interrupt is triggered on a falling edge. It is possible to combine the modes so that the interrupt is triggered on both a rising and a falling edge with the OR operator | :
pin_button.irq(trigger=Pin.IRQ_FALLING | Pin.IRQ_RISING,handler=button_isr)
Here are some functions that may be useful to you:
irq.init(): Re-initialize the interrupt. It will be automatically reactivated.irq.enable(): Enable the interrupt.irq.disable(): Disable the interrupt.irq(): Manually launch the call of the interrupt routine.irq.flags(): Know the type of event that triggered the interrupt. Can only be used in the``isr`` .def pin_handler(pin): print('Interrupt from pin {}'.format(pin.id())) flags = pin.irq().flags() if flags & Pin.IRQ_RISING: # handle rising edge else: # handle falling edge # disable the interrupt pin.irq().deinit()
To use these functions, you have to use the variable of the pin that is attached to an interrupt, for example pin_button.irq().enable() .
You now know the basics of using interrupts in MicroPython. You may want to` consult the official documentation <https://docs.micropython.org/en/latest/library/machine.Pin.html#machine.Pin.irq>`__ to use all their potential, for example to set priorities between several interrupts that are triggered at the same time. Some tips and optimization are presented in the advanced section 😎.
Use global variables to manage events in the main program
We try to limit the number of actions done in an interrupt. It is common to increment a variable in the``isr`` and to do the long tasks in the main code according to the value of this variable. Here is an example that counts the number of times you press a push button.
import time
from machine import Pin

button_pressed_count = 0 # global variable
pin_button = Pin(14, mode=Pin.IN, pull=Pin.PULL_UP)

def button_isr(pin):
    global button_pressed_count
    button_pressed_count += 1


if __name__ == "__main__":
    button_pressed_count_old = 0
    pin_button.irq(trigger=Pin.IRQ_FALLING,handler=button_isr)

    while True:
        if button_pressed_count_old != button_pressed_count:
           print('Button value:', button_pressed_count)
           button_pressed_count_old = button_pressed_count

        if button_pressed_count > 10: # heavy task here
            ...
We use a global variable to be able to write to it in the interrupt routine.
Warning
Even if the variable is defined at the very top of the Python script, you must add the keyword global when the variable is used in a function. This tells the Python interpreter to use the global variable instead of creating a local variable (with the same name), which would be used only in the execution context of the function.
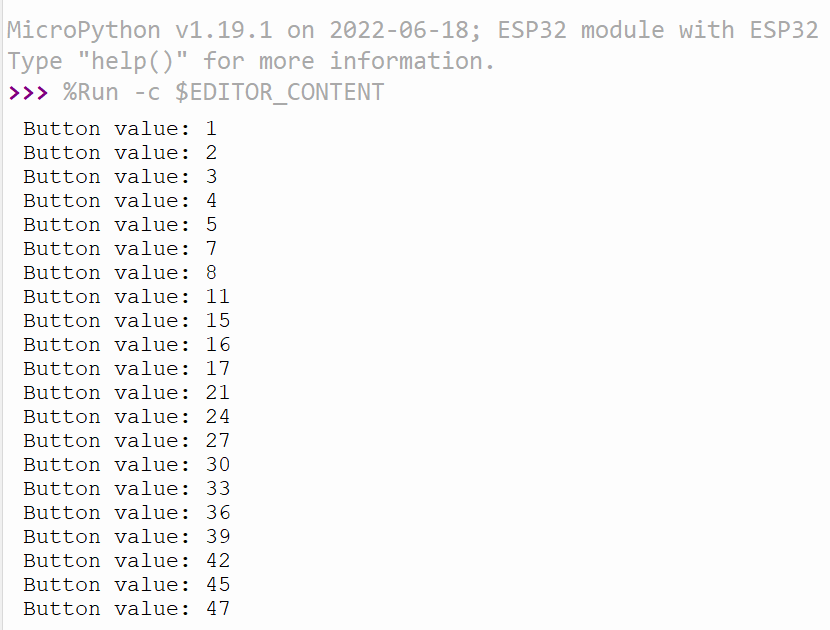
When running the MicroPython script, the increment value is much larger than the number of presses we did. Weird 🤔? It’s because of the transitions of the logic levels at the push button that are not perfect..
Improve reliability of outage detection
You may have noticed that with push buttons, there are false positives: the interrupt routine runs more times than it should. This is because the signal received by the ESP32 is not perfect: it is as if it had received a “double press” of the button:
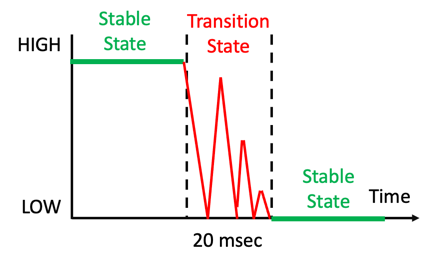
This is called the bounce effect. We can reduce the bounce of a push-button via the Python script directly. This is called debouncing software. It consists in not taking into account the transitory period between the 2 logical states by waiting a certain delay.
This section is available to premium members only. You still have 91% to discover.
Subscribe for only 5$/monthAlready subscribed? Sign in