
Generate variable voltages with the Pi Pico PWM in MicroPython
(Updated at 12/26/2022)
PWM is a trick to generate variable voltages on digital pins
The PWM is a technique that allows the generation of a voltage between 0 and 3.3V using only digital outputs . PWM is the acronym for Pulse With Modulation . Indeed, this trick is based on the temporal proportion of a logic signal at its high state (3.3V) and its low state (0V): the PWM consists in varying the width of an electrical pulse.
Note
The PWM allows the generation of constant voltages whose value can be changed. It does not generate alternating voltages as a DAC could do.
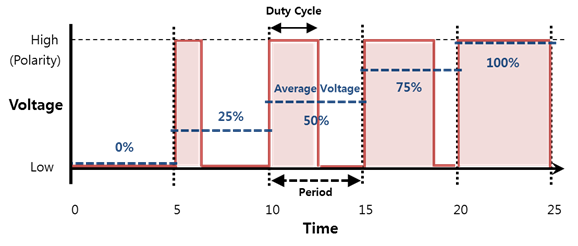
The succession of pulses with a given width is seen on average as a constant voltage between 0V and 3.3V, whose value is determined by :
with \(α\) , the duty cycle (the pulse width in percent)
A PWM signal is configured via the duty cycle and the pulse frequency. We can modify these two parameters in MicroPython.
In practice, PWM is used to :
Controlling the speed of a motor
Controlling the brightness of LEDs
Generate square signals (with α=0.5)
Generate music notes (sound similar to retro consoles)
PWM performance on the Raspberry Pi Pico
The microprocessor doesn’t generate PWM signals permanently but uses dedicated hardware blocks. You only need to configure the PWM blocks once in the script to permanently create the signal in the background. We associate the output of a PWM block with a pin of our board. The processor resources will then be free to execute other tasks.
Each PWM block can have an independent frequency.
PWM characteristics |
Pi Pico |
|---|---|
Frequency range of the PWM signal |
7 Hz to 125 Mhz |
Independent PWM frequency |
8 |
PWM Output |
16 |
Duty cycle resolution |
16 bits |
Note
In most cases, a PWM frequency of around 1000 Hz will be sufficient.
PWM on MicroPython with Pico
Using PWM with MicroPython is very simple. MicroPython automatically selects an available PWM block: it is unnecessary to indicate which one you intend to use. The hardware part described above is completely hidden.
The configuration consists in associating a PWM object to a Pin object and choosing the PWM frequency.
from machine import Pin, PWM

pin = Pin(25, mode=Pin.OUT)
pin_with_pwm = PWM(pin) # Attach PWM object on a pin
Note
Since the PWM object is also in the machine module, we can combine the two imports on a single line:
from machine import Pin
from machine import PWM
is equivalent to:
from machine import Pin, PWM
Once the pin of the board is linked to our PWM object, all the functions are done directly on the PWM object (unlike the Arduino code where we have to specify the pin number with the function analogWrite(pin_number) .
Note
In python, you can insert underscores _ to make the numbers easier to read (and thus avoid counting zeros on large numbers). For example, to write 1 MHz instead of having 1000000 , we can put 1_000_000 .
We use the function .duty_u16() to select the duty cycle with a value between 0 and \(2^{16}-1\) (0-65535). The voltage is set directly on the output of the previously selected pin.
Warning
For those who have already used MicroPython on the ESP32, you will notice that u_16 has been added to the function name. It specifies that the function expects an input value of up to 16 bits (and not up to 10 bits on the ESP32 with the .duty() ).
To visually notice the voltage variation, you can use the built-in Pico LED with the following script:
from machine import Pin, PWM

LED_BUITLTIN = 25 # For Raspberry Pi Pico

pwm_led = PWM(Pin(LED_BUITLTIN, mode=Pin.OUT)) # Attach PWM object on the LED pin

# Settings
pwm_led.freq(1_000)

while True:
    for duty in range(0,65_536):
        pwm_led.duty_u16(duty) # For Pi Pico
Warning
The function range(0, 65_536) counts between 0 and 65 535 : the last element is excluded.
Specify the duty cycle percentage to make it more meaningful, and then apply the formula.
from machine import Pin, PWM

LED_BUITLTIN = 25 # For Raspberry Pi Pico

pwm_led = PWM(Pin(LED_BUITLTIN, mode=Pin.OUT)) # Attach PWM object on the LED pin
pwm_led.freq(1_000)

duty_cycle = 50 # Between 0 - 100 %
pwm_led.duty_u16(int((duty_cycle/100)*65_535))
We can modify the brightness of the LED by changing the duty cycle between 0 and 100%.
from machine import Pin, PWM
import time

LED_BUITLTIN = 25 # For Raspberry Pi Pico

pwm_led = PWM(Pin(LED_BUITLTIN, mode=Pin.OUT)) # Attach PWM object on the LED pin
pwm_led.freq(1_000)

while True:
    for duty in range(101): # Duty from 0 to 100 %
        pwm_led.duty_u16(int((duty/100)*65_535))
        time.sleep_ms(10)
Mini-Project: Dimming the built-in LED of the Raspberry Pi Pico
With all that we have seen, the script is straightforward to do:
from machine import Pin, PWM

LED_BUITLTIN = 25 # For Raspberry Pi Pico

pwm_led = PWM(Pin(LED_BUITLTIN, mode=Pin.OUT)) # Attach PWM object on the LED pin

# Settings
pwm_led.freq(1_000)

while True:
    for duty in range(0,65_536, 5):
        pwm_led.duty_u16(duty)
    for duty in range(65_536,0, -5):
        pwm_led.duty_u16(duty)
Note
For dimming the LED quickly, we vary the duty from 5 to 5 with range(0, 65_536, 5) . To decrease a value, we put a step of -5 range(65_536, 0, -5) .